The Jump-throw, as the name suggests, is the act of jumping + throwing at just the perfect interval to achieve smoke lineups and placements; otherwise not possible with just standard nade-throws.
Some of the most useful smoke lineups in CS: GO require a perfectly executed Jump-throw to pull off correctly. An example is the standard Mirage B-site smoke for Market Window, thrown from Back Alley using a Jump-throw.
While you can master the timing required to execute Jump-throws in CS: GO reliably, there is an easier, foolproof way of ensuring that smoke lineups that require a Jump-throw will end up where you intend them to be.
How to Jump-throw (Manual Method)

The manual Jump-throw is by far the most simple to do but the most difficult to master.
Jump-throws in CS: GO can be a little janky at times. Sometimes, your smoke lineup ends up where you want it to land. Other times, the Smoke Grenade lands someplace else altogether.
You must get the timing right to execute a flawless smoke grenade + jump-throw lineup. Here are a few tips to remember:
- The left click goes first.
- Manual Jump-throws are a two-action affair.
As mentioned above, a manual Jump-throw is more of a rapid-fire, one-two combo, where the left mouse button is clicked first, rather than a simultaneous actuation of the left mouse button and the keyboard space bar (or whichever button you have bound with “Jump” in CS: GO)
Just keep these two tips in mind, and you will figure out how to throw your manual Jump-throws correctly quickly.
How to create a Jump-throw Configuration File (Script Bind)
The manual Jump-throw is good, but what if we told you that you could execute perfect Jump-throws every time with just a click of a button? Don’t believe us? Then read on!
Read: How To Practice Recoil Control in CS: GO
The beautiful thing about CS: GO’s raw game engine and simple interface is the ability to use strings to change in-game settings through Custom Configuration Files.
Through Custom Configuration Files, players can legally (Valve Anti-cheat Friendly) “bind” specific buttons of their choice to certain in-game actions.
One example is the ability to change the First-person handedness from left to right on the fly through a key bind.
Adding keybindings through a CFG file is simple.
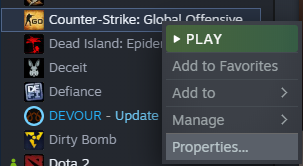
- Go to your Steam Library:

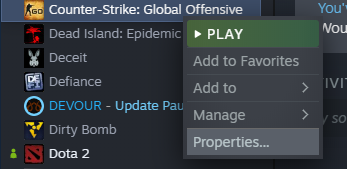
2. Right-click on Counter-Strike: Global Offensive, then choose “Properties”:
3. In this window, click on “Local Files” then choose “Browse”:

4. The CS: GO installation folder should pop up:

5. Open the “csgo” folder, then double-click on the “cfg” folder:

7. Copy then paste the “ai.cfg” file into the same folder. A copy of the “ai.cfg” file should appear:

8. Rename the “ai – Copy.cfg” file to “autoexec.cfg”:

9. Open the “autoexec.cfg” file using Notepad. Delete everything currently in it:

10. Copy and paste the following into the “autoexec.cfg” file:

alias “+jumpthrow” “+jump;-attack”
alias “-jumpthrow” “-jump”
bind “c” +jumpthrow
11. Change the word “key” to any button you want to use as the Jump-throw key bind in-game.
For this example, we will use “c” on our keyboard as our button of choice.
12. Save the “autoexec.cfg” file, then close the window:

Finally, we need to add a simple Launch Option for CS: GO so that it automatically activates the “autoexec.cfg” file upon launching the game:
13. From the Steam Library, right-click on CS: GO once again, then choose “Properties”:
14. Under the “General” tab, locate “Launch Options,” then type in the following:
+exec autoexec

15. Close the window, then launch CS: GO.

How to Use the Jump-throw Keybind

Using the Jump-throw Keybind in-game is simple:
- Line up your favorite Jump-throw smoke setup

2. Hold the Left-click button on your mouse:

3. press or click your assigned Jump-throw button while holding left-click.
In this case, we pressed “c” while still holding the left click.


Holding the left-click button will prime the Smoke Grenade. Once the key bind for jump-throw is clicked or pressed, your character will automatically throw a perfect Jump-throw smoke every time.
Jump-throws Made Easy
Jump throws have always been more of a miss than a hit for most people in CS: GO. The Jump-throw mechanic is so janky and unreliable most of the time, which causes players to fail to set up crucial smoke cover for their team.
Fortunately, failed Jump-throw smoke setups are now a thing of the past, thanks to the custom Jump-throw key bind we have shown you in this article.
The best thing about this custom configuration file for CS: GO Jump-throw binds is that it is completely VAC or anti-cheat safe. You can use this custom key bind in any game mode in CS: GO. Even stricter esports clients like FACEIT allow this custom key bind for Jump-throws in CS: GO. Neat!